Because the best adventure starts before you leave the driveway.
There is a particular kind of Saturday morning that van lifers talk about for years afterward.
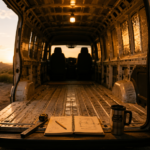
Not the morning you wake up on a clifftop somewhere beautiful, though that comes later and it is everything you imagined. The morning I mean is earlier than that — the one where you slide open the door of a bare cargo van for the first time, climb inside, and stand in the empty metal shell of what is about to become your home.
It smells like steel and possibility. The walls are bare. The floor is cold. There is nothing here yet except space — and the slowly dawning realization that you are about to turn this empty rectangle into somewhere a person can actually live.
That moment is terrifying and exhilarating in equal measure. And most people who have done a camper van renovation will tell you the same thing: they had no idea what they were doing when they started, and they figured it out anyway.
This guide exists to give you a head start they did not have. It covers everything — from the first decision you need to make before you buy a single piece of insulation, to the final details that turn a functional van build into a home you are genuinely proud of. Whether you are planning a budget weekend warrior build or a full-time live-in conversion, this is the roadmap.
Get the : The Ultimate Guide to Converting a Campervan
Before You Start: The Four Questions That Shape Everything
Before you buy tools, watch YouTube tutorials, or argue with yourself about whether to go diesel or propane, there are four questions you need to answer honestly. Your answers determine every subsequent decision.

1. How will you use this van?
Weekend adventures only? Full-time living? Three-month road trips with occasional returns to a fixed address? The van you build for occasional weekend use looks dramatically different from the van you build for 365 days a year. A weekend warrior can sacrifice comfort and storage for simplicity. A full-timer needs a proper bed, a functional kitchen, reliable power, and enough storage to hold an entire life.
2. Who is living in it?
Solo builds are simpler — a single sleeping platform, one person’s worth of storage, a kitchen sized for one. Couple builds require a full-width bed (or a very comfortable compromise), double the storage, and the kind of spatial thinking that tests relationships before the first mile is driven. Building for a family introduces complexity that requires a dedicated layout guide of its own.
3. What is your budget?
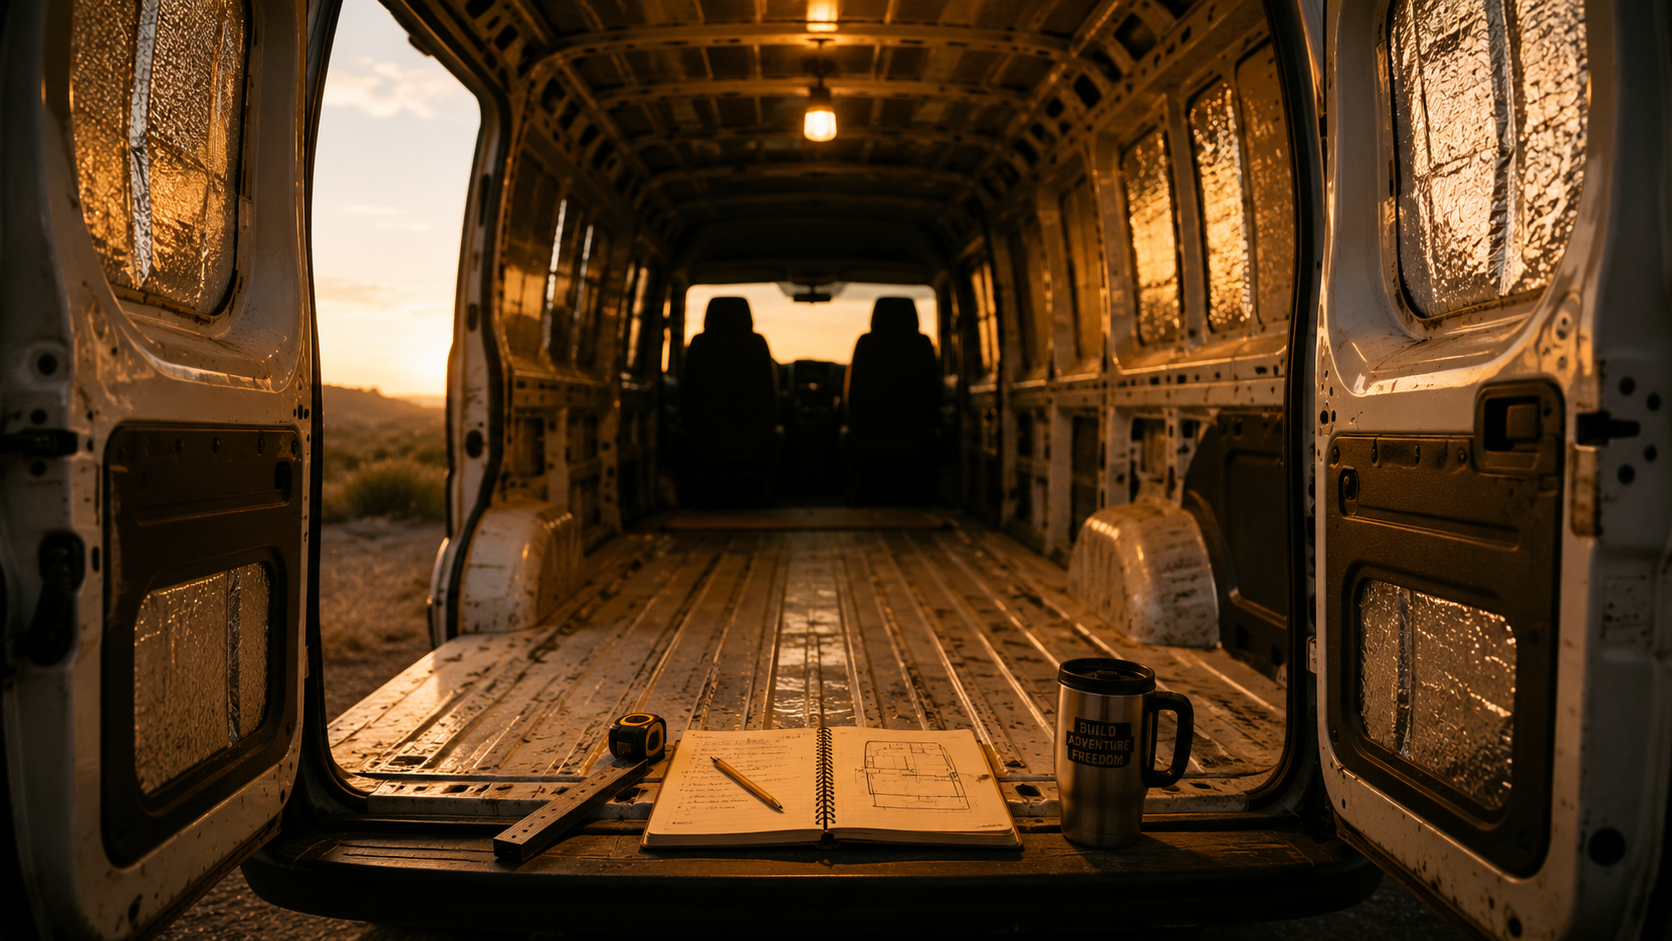
Be honest, then add 20%. Van renovations almost always cost more than the initial estimate — not because of bad planning, but because every decision reveals three more decisions, and some of those decisions cost money. A bare-bones functional build can be completed for $1,500–$3,000 with careful sourcing and DIY labor. A mid-range comfortable build runs $3,000–$8,000. A high-end full-time home on wheels can reach $15,000–$30,000 or more.
4. What are your non-negotiables?
Everyone has two or three things they absolutely cannot compromise on. For some people it is standing height. For others it is a real mattress, a hot shower, or a dedicated workspace. Identify your non-negotiables before you start and build around them. Everything else can be flexible.
Phase 1: Choosing and Preparing Your Van
Choosing the Right Base Vehicle
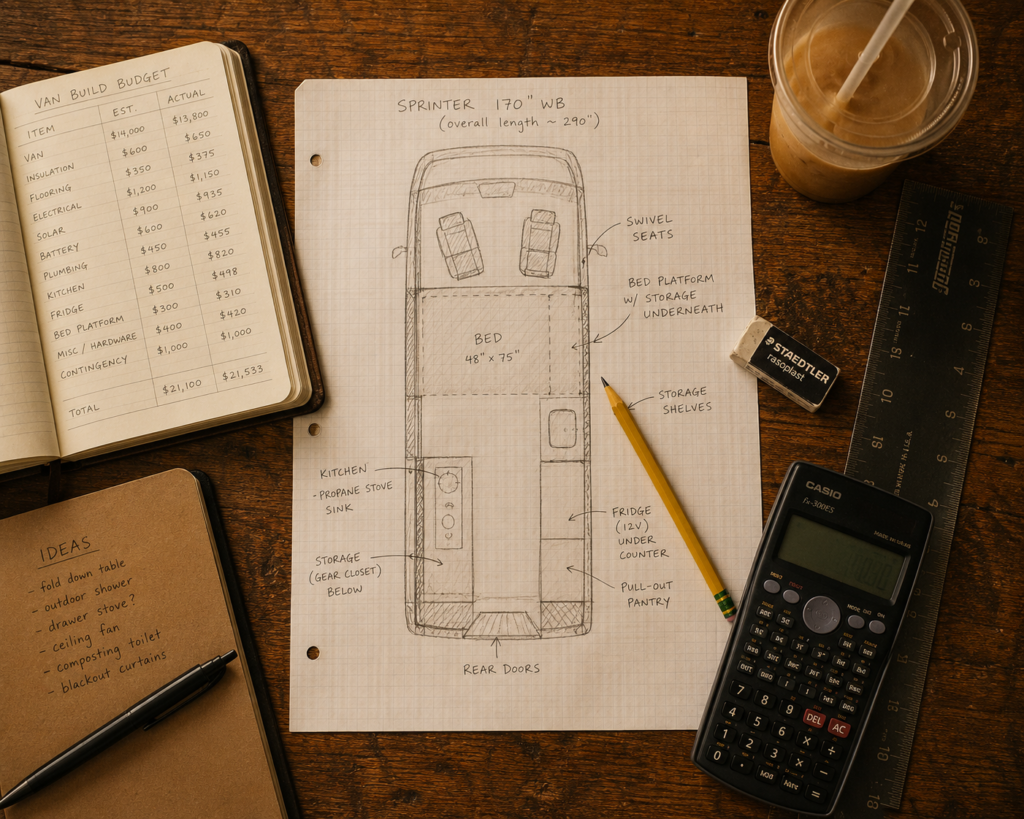
The most common mistake in van renovation is falling in love with a specific van before understanding what it can and cannot offer. Here is an honest breakdown of the most popular options:
Ford Transit — The most popular van for conversion in the US and increasingly in Europe. Available in three roof heights and three lengths, with a high-roof extended version that gives you standing room and enough length for a fixed bed plus kitchen plus storage. Reliable, parts are everywhere, mechanics know them. Slight disadvantage: the wheel arches intrude into the living space.
Mercedes Sprinter — The gold standard of van conversions. Better build quality than the Transit, slightly more interior space, and a following so devoted that entire conversion businesses have built their model around it. The disadvantage: more expensive to buy, more expensive to repair, and Mercedes dealers are not always sympathetic to the way van lifers treat their vehicles.
Ram ProMaster — Front-wheel drive makes it unusual in this category but gives it a flat floor with no wheel arch intrusion — a significant advantage for layout flexibility. Slightly less refined than the Transit or Sprinter but excellent value and roomy.
VW Crafter / MAN TGE — Popular in Europe, increasingly available in the US. Solid build quality, good fuel economy, slightly smaller interior than the Transit or Sprinter in equivalent specs.
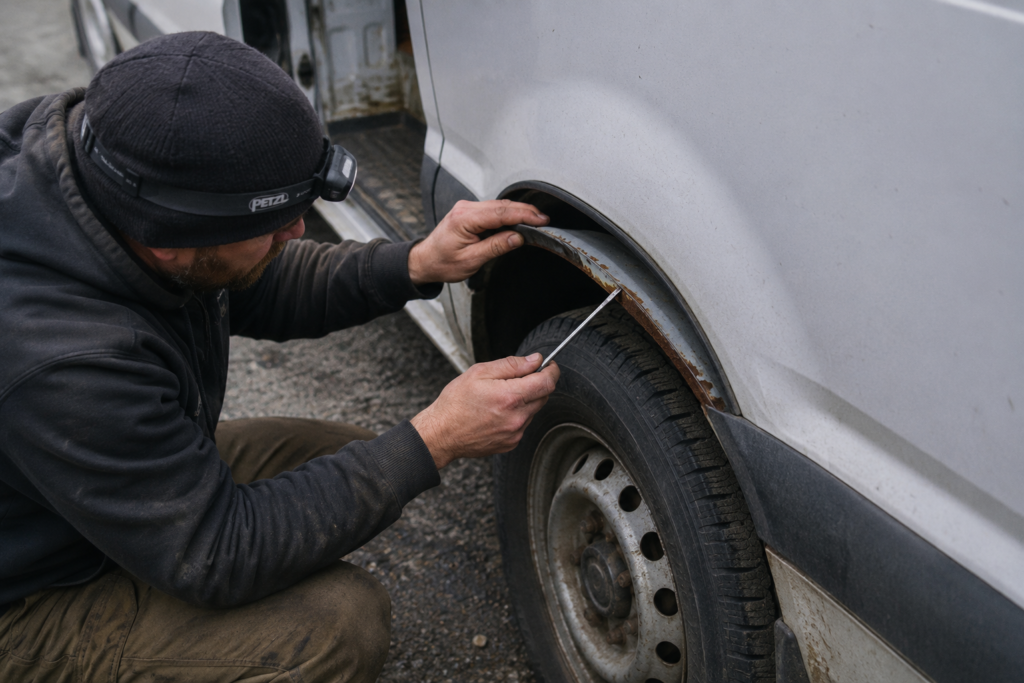
What to look for when buying: The engine and transmission history matter more than cosmetic condition. A van with 150,000 miles and a full service history is worth more than a 60,000-mile van with gaps in its records. Pay for a pre-purchase inspection from a mechanic who is not the seller. Check for rust — especially around the roof seams, the wheel arches, and the rear door frame. These are the areas where water gets in and stays, and rust in these locations is expensive to fix and structurally important.
Cleaning and Stripping the Van
Before any renovation work begins, the van needs to be completely stripped and thoroughly cleaned.

Remove any factory shelving, bulkheads, or fittings from previous commercial use. Check every bolt hole and seam for existing rust. Sand any surface rust back to bare metal and treat it immediately with a rust converter and primer — left alone, rust continues to spread under insulation and you will not discover it until significant damage has been done.
Clean every surface with a degreaser. Cargo vans accumulate years of grime in places you cannot see until you are inside with a headlamp. Clean it all. You are about to seal this interior for years — start with a clean foundation.
Phase 2: Insulation — The Decision That Affects Every Day You Live In This Van
Insulation is the most debated topic in van conversion communities, and for good reason. Get it right and your van stays comfortable in temperatures from freezing to roasting. Get it wrong and you spend years managing condensation, cold floors, and heating bills that undermine the economics of the whole project.
Understanding the Three Problems Insulation Solves
Thermal: Keeping heat in during cold weather, keeping heat out during summer. The effectiveness of insulation is measured in R-value — the higher the R-value, the better the thermal resistance.
Condensation: When warm, humid interior air meets cold metal van walls, condensation forms. Without proper vapor management, this moisture accumulates inside your insulation, promotes mold, and eventually causes rust from the inside. The solution is not simply more insulation — it is the right insulation in the right order.
Sound: A bare metal van is extremely loud in rain and at speed. Good insulation dramatically reduces road and weather noise.
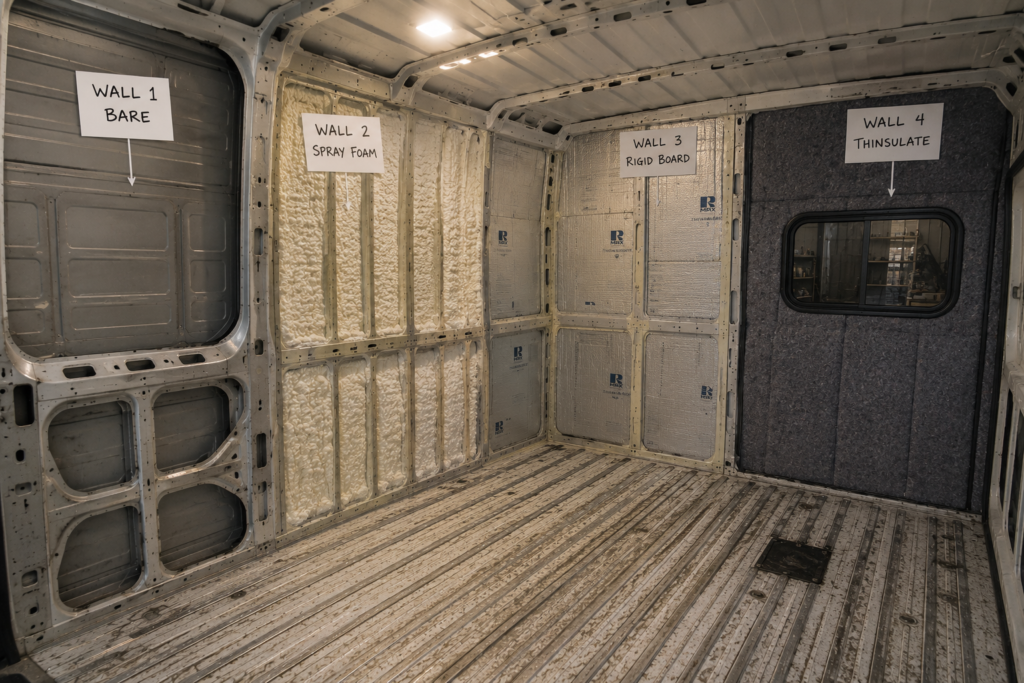
The Main Insulation Materials
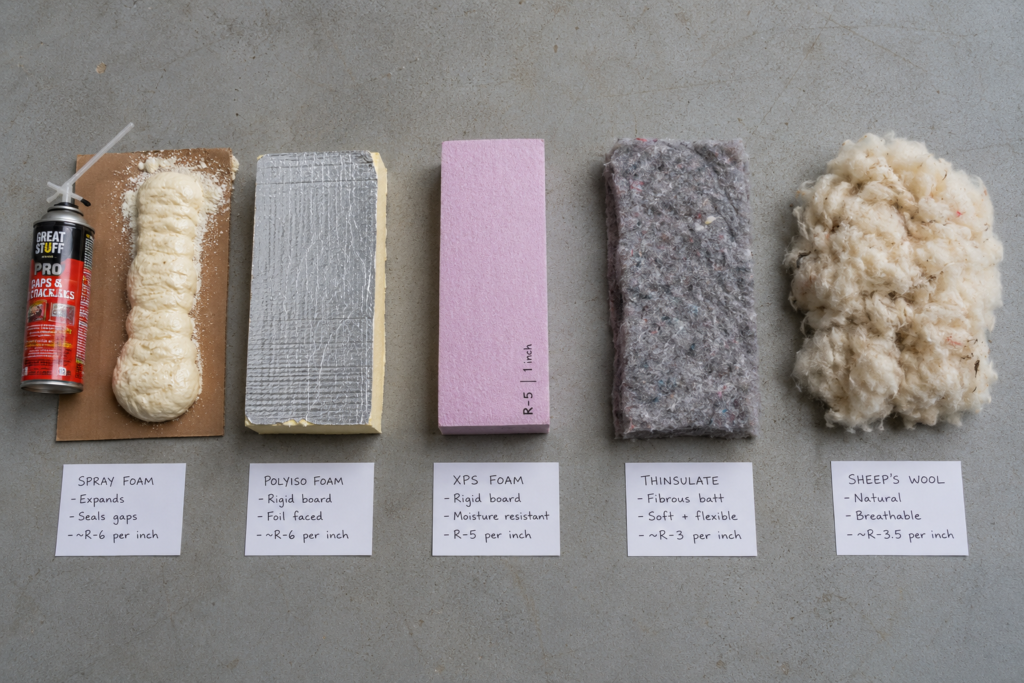
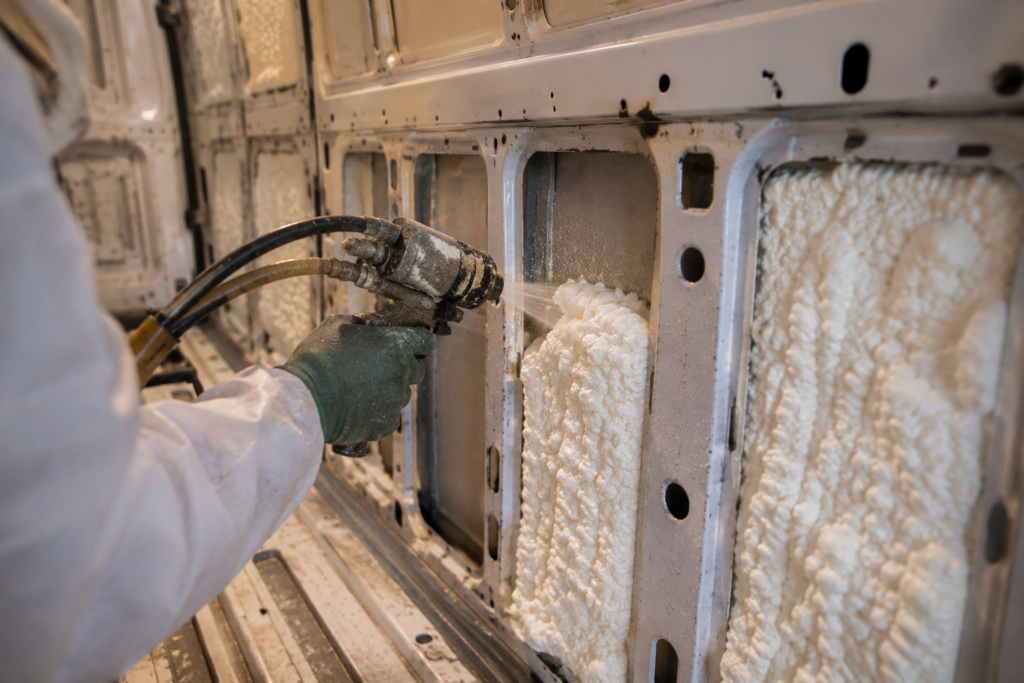
Spray foam — Expanding polyurethane foam that fills every crevice and gap in the van’s structural ribs and cavities. Excellent for the complex curved areas of the van that rigid insulation cannot reach. Provides both thermal insulation and a vapor barrier. Messy to apply and impossible to remove, but the most thorough solution for filling cavities.
Polyiso rigid foam board — The highest R-value per inch of any accessible insulation material. Cut to fit flat panels and glued directly to the van walls and ceiling. R-value of approximately 6–6.5 per inch. The preferred choice for the large flat wall and ceiling sections.
XPS (extruded polystyrene) foam board — Slightly lower R-value than polyiso (R-5 per inch) but more moisture-resistant and slightly easier to work with. Good alternative to polyiso, particularly for floor insulation where moisture resistance matters.
Thinsulate — A synthetic fiber insulation similar to what is used in outdoor clothing. Popular in van conversions because it handles moisture better than foam — it retains some insulating value even when damp, rather than losing it entirely. Good for the curved ceiling sections and areas around windows and door frames where rigid foam is difficult to fit neatly.
Sheep’s wool — A natural alternative with excellent thermal and moisture-management properties. Wool can absorb significant moisture without losing insulating value and then release it slowly — a genuinely appealing property in a van context. More expensive than synthetic options but increasingly popular among eco-conscious builders.
The Condensation Question
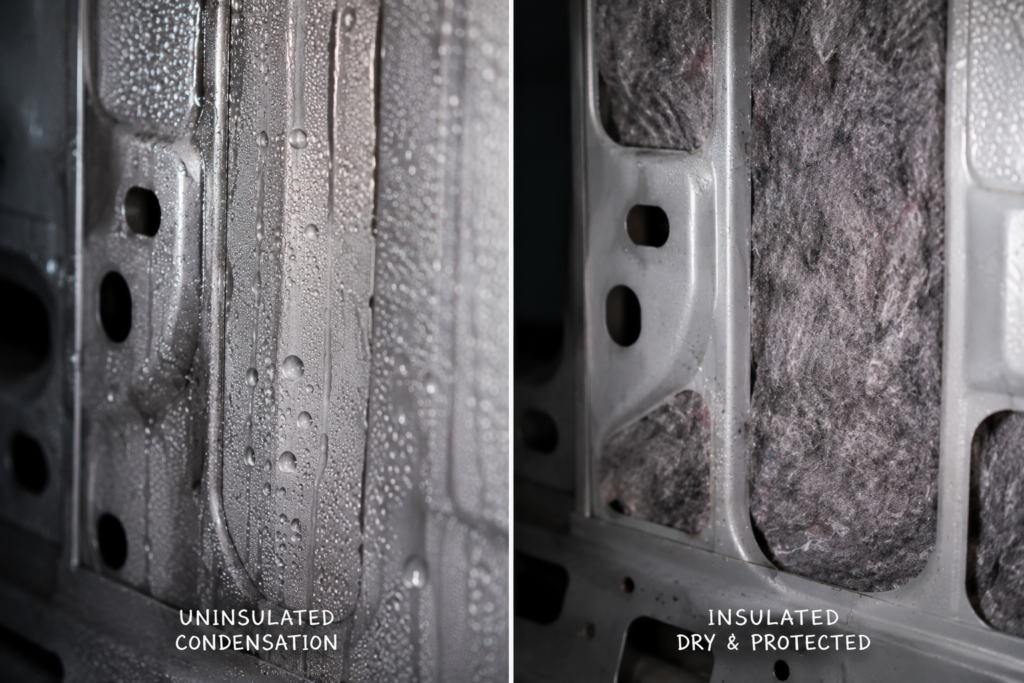
The van conversion community has moved significantly in its thinking on this topic over the past five years. The previous consensus — seal everything with closed-cell foam and create a perfect vapor barrier — has been challenged by builders who found that attempting to create a perfect seal in a metal van is essentially impossible, and that trapped moisture with no escape route causes more problems than managed vapor movement.
The current best practice is to use insulation that handles moisture gracefully (Thinsulate, wool) rather than trying to eliminate all moisture movement, and to ensure your van has adequate ventilation — a good roof vent that can run continuously is more important for condensation management than any insulation choice.
Insulating the Floor
The floor is often under-insulated in van conversions because builders are conscious of losing ceiling height. But a cold floor is one of the most uncomfortable things about van living in winter.
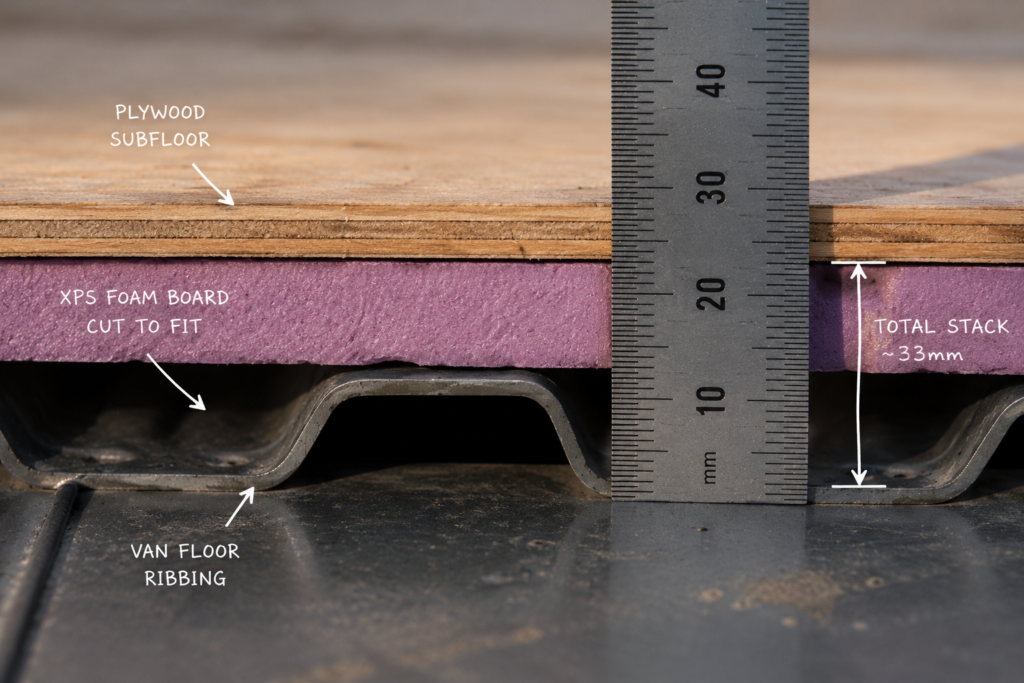
Lay a layer of XPS foam board between the van’s floor ribs, then cover with a sheet of plywood. The plywood provides a solid, flat working surface for everything built on top of it and adds some additional thermal mass. Total floor insulation stack: 1 inch of XPS plus 12mm plywood loses approximately 33mm of ceiling height — a worthwhile trade for the comfort gained.
Phase 3: Walls, Ceiling, and Flooring
Cladding the Walls and Ceiling
The most common interior cladding choices:
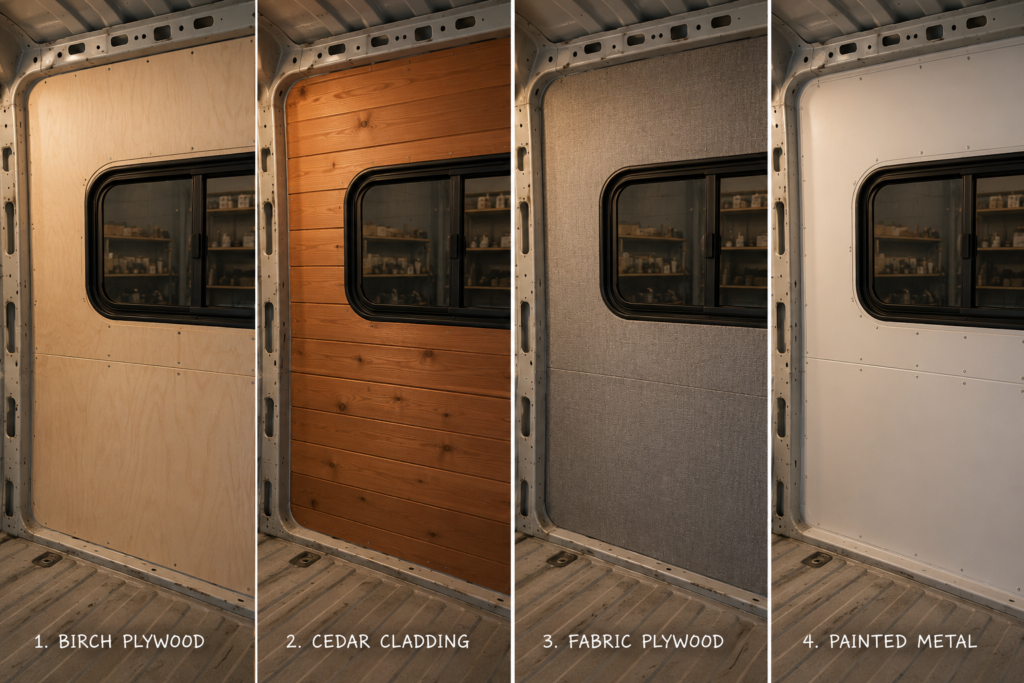
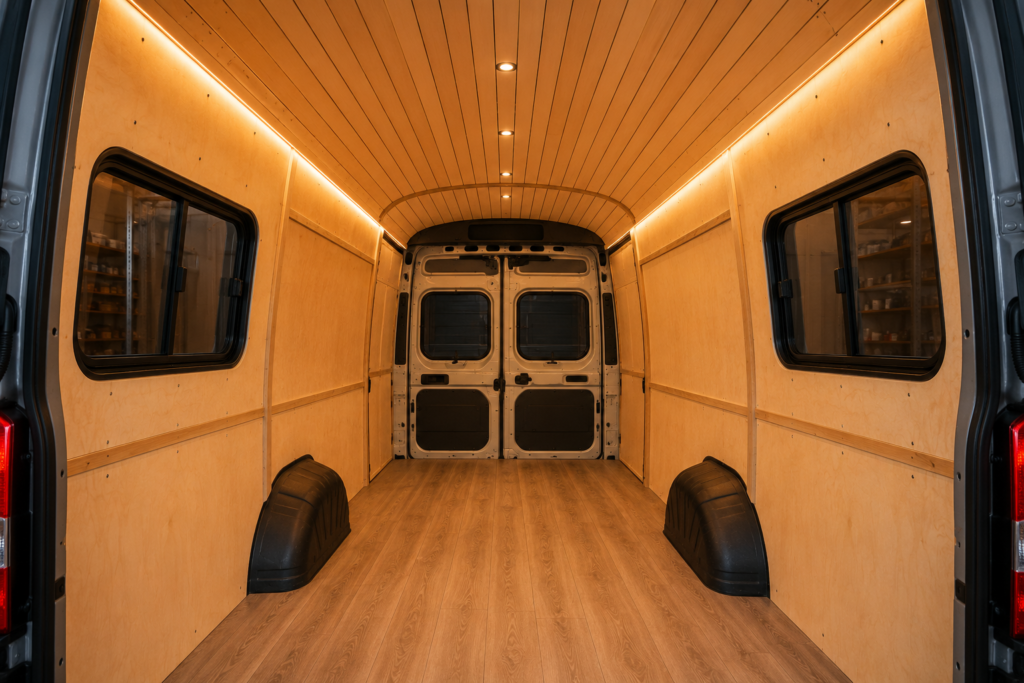
Thin plywood panels — 4mm or 6mm birch plywood cut to fit the van’s wall curves and glued or screwed to battens attached to the van’s structural ribs. The most versatile option — easy to paint, stain, or cover with fabric. Creates a solid surface to attach things to.
Tongue and groove timber cladding — Cedar, pine, or spruce planks fitted horizontally or vertically across the walls and ceiling. Creates a warm, cabin-like aesthetic that photographs beautifully and feels genuinely homey. Slightly heavier than plywood and more complex to fit around curves and windows.
Fabric wall panels — Plywood panels covered in fabric before installation. Soft, warm, and acoustically better than hard surfaces. Limits your ability to screw things into the walls after installation but creates a distinctive and comfortable interior.
Painted metal — Some builders skip cladding entirely, painting the insulated metal walls directly. Minimalist, lightweight, and straightforward. Works best in a contemporary or industrial aesthetic.
The Ceiling
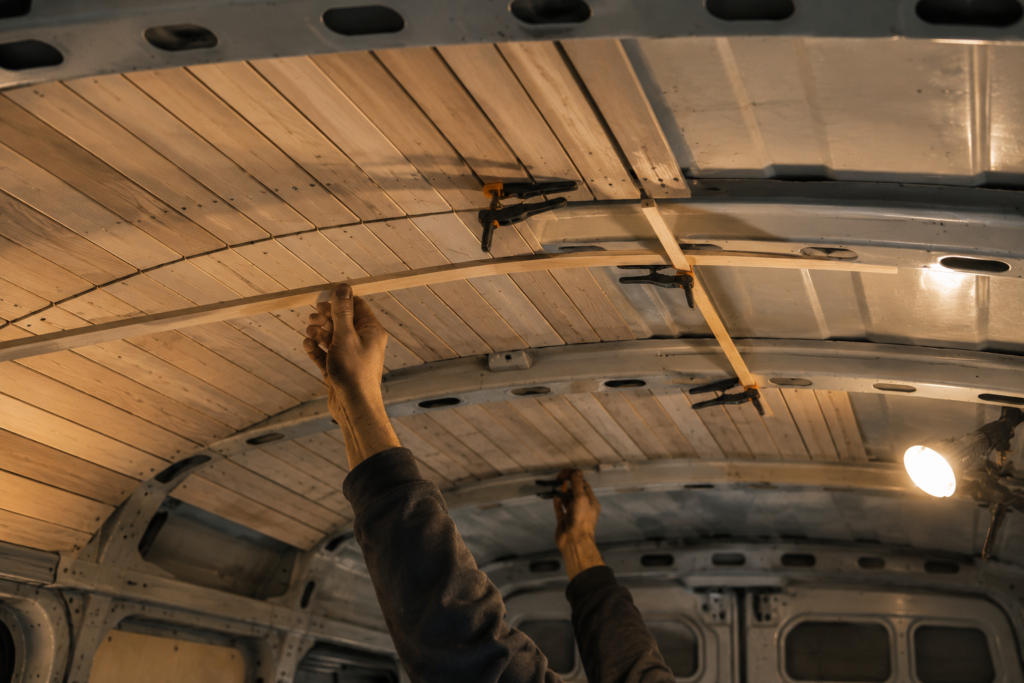
The ceiling is the most visible surface in a van interior and the one that most defines the aesthetic character of the finished build. It is also the most structurally complex to clad, because van ceilings are curved in two directions simultaneously.
Thin timber strips — 50mm wide, 6mm thick — bent gently across the ceiling curve and fixed to ceiling battens is the classic approach. The strips flex to follow the curve without cracking. Leave small gaps between strips for an intentional, slatted effect that also allows slight air movement — or fit them tight together for a more solid ceiling.
Whatever ceiling material you choose, run your wiring before the ceiling goes on. This is the mistake that costs the most time to fix — having to remove a finished ceiling to access wiring that should have been run before installation.
Flooring
The floor is subject to heavy wear — boots, water, dirt, dogs, dropped tools. It needs to be durable, water-resistant, and comfortable underfoot.
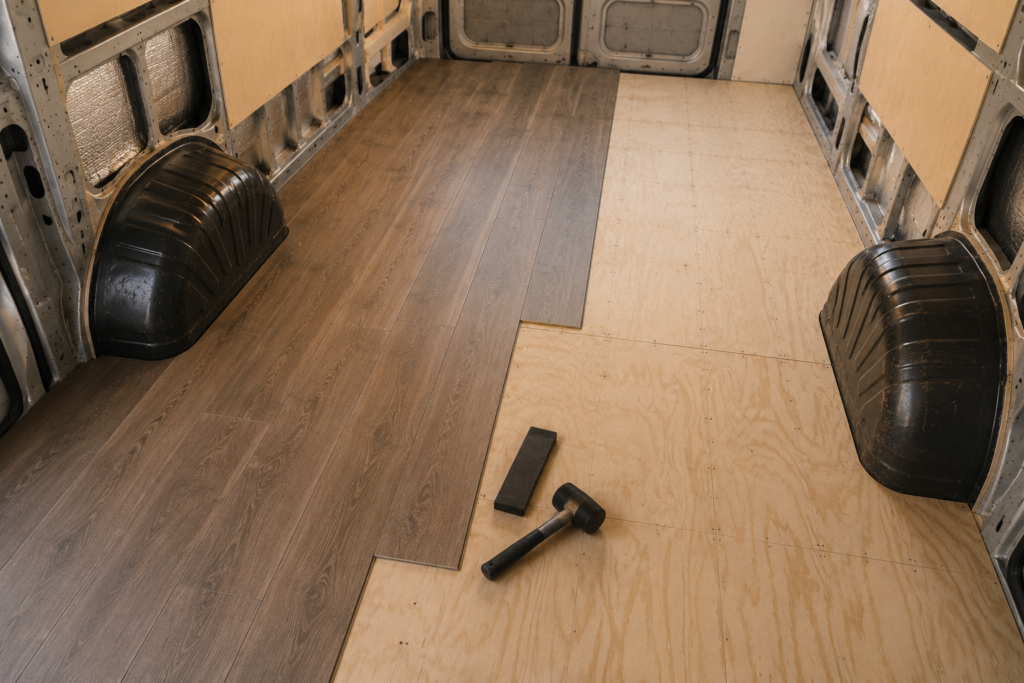
Vinyl plank flooring — The most popular choice for good reason. Waterproof, durable, easy to clean, available in dozens of wood-effect patterns, and easy enough to cut and fit yourself. Click-lock vinyl plank goes down over the plywood subfloor in a few hours.
Engineered hardwood — Better looking than vinyl, slightly more vulnerable to water if it gets into the joints. Beautiful in a high-end build but requires more careful sealing around edges.
Rubber flooring — Practical, extremely durable, easy to clean, and provides cushioning underfoot. Less aesthetically interesting but excellent for anyone prioritizing function over appearance.
Phase 4: The Electrical System — Power Everything, Understand Nothing (Until Now)
The electrical system is the element that intimidates most first-time van builders, and the one they most often get wrong. Here is the clearest possible explanation of how a van electrical system works and what you actually need.
The Core Components
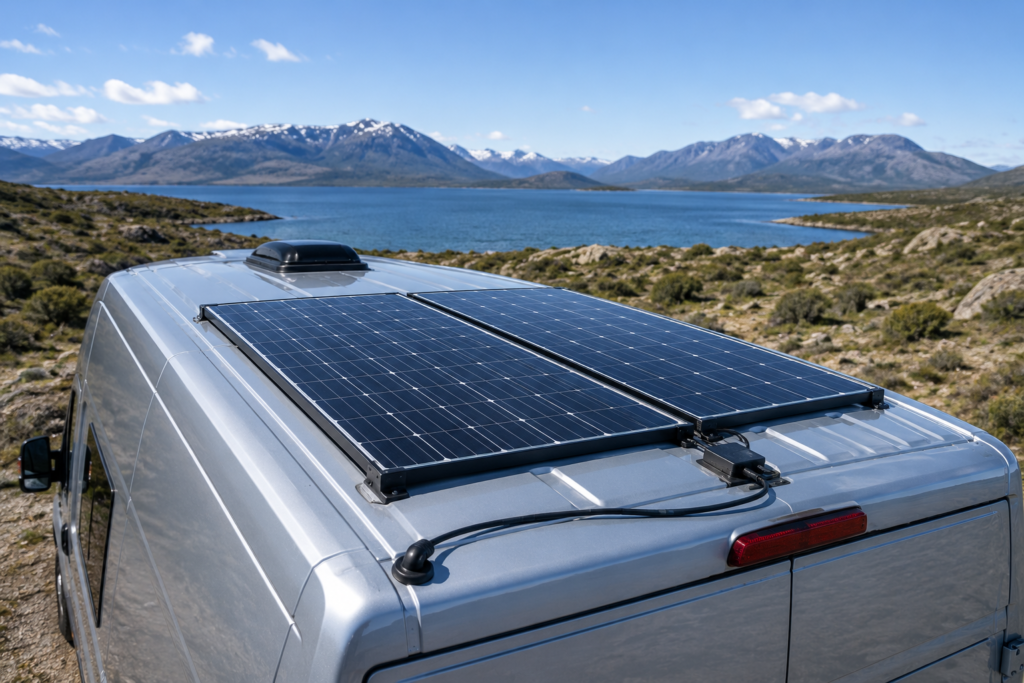
Solar panels collect energy from the sun and convert it to DC electricity. Mounted on the van roof, they are the primary charging source for most van builds that spend time in sunny locations.
A charge controller sits between the solar panels and the battery bank, regulating the flow of electricity to prevent overcharging and battery damage. A MPPT (Maximum Power Point Tracking) controller is significantly more efficient than a PWM controller and worth the modest additional cost.
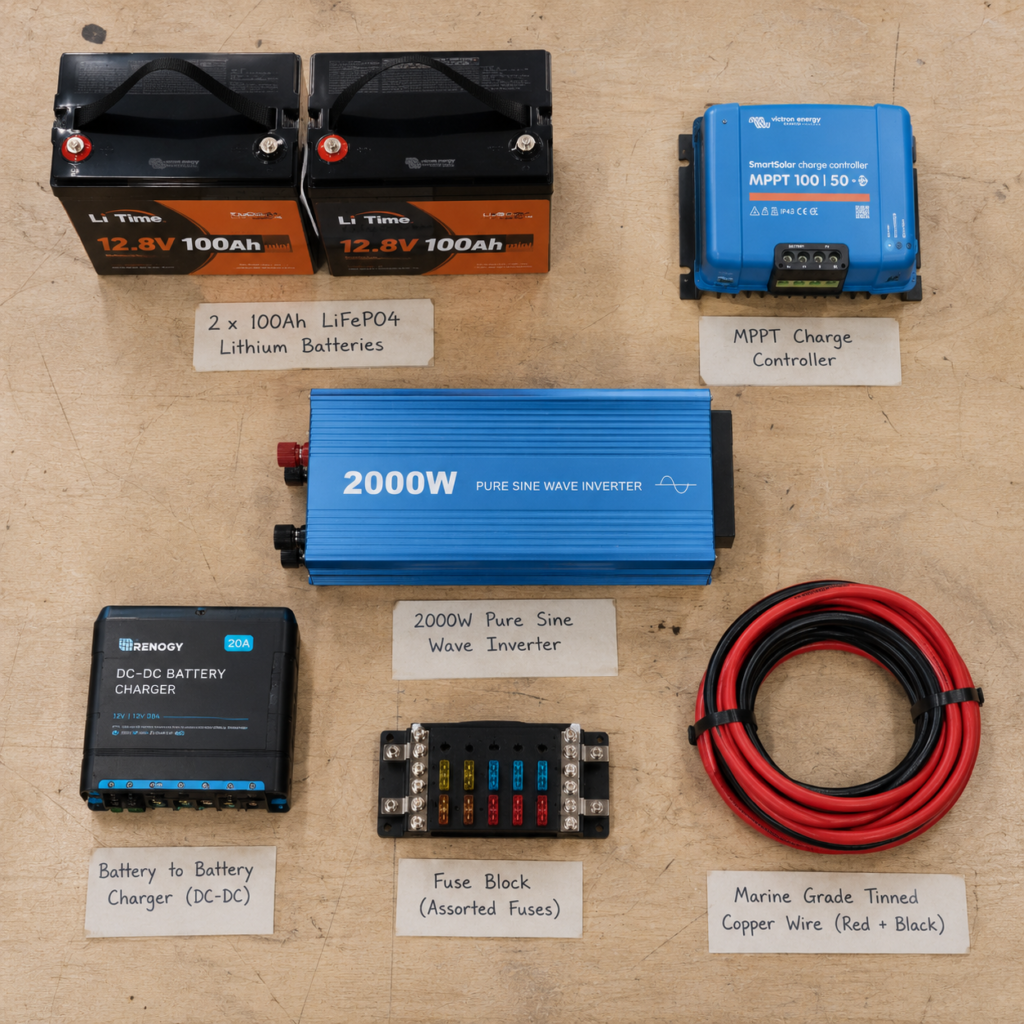
The battery bank stores the electricity collected by the solar panels. It is the heart of your electrical system — everything you run draws from it, and everything you charge adds to it. Battery choice is one of the most significant decisions in the entire build.
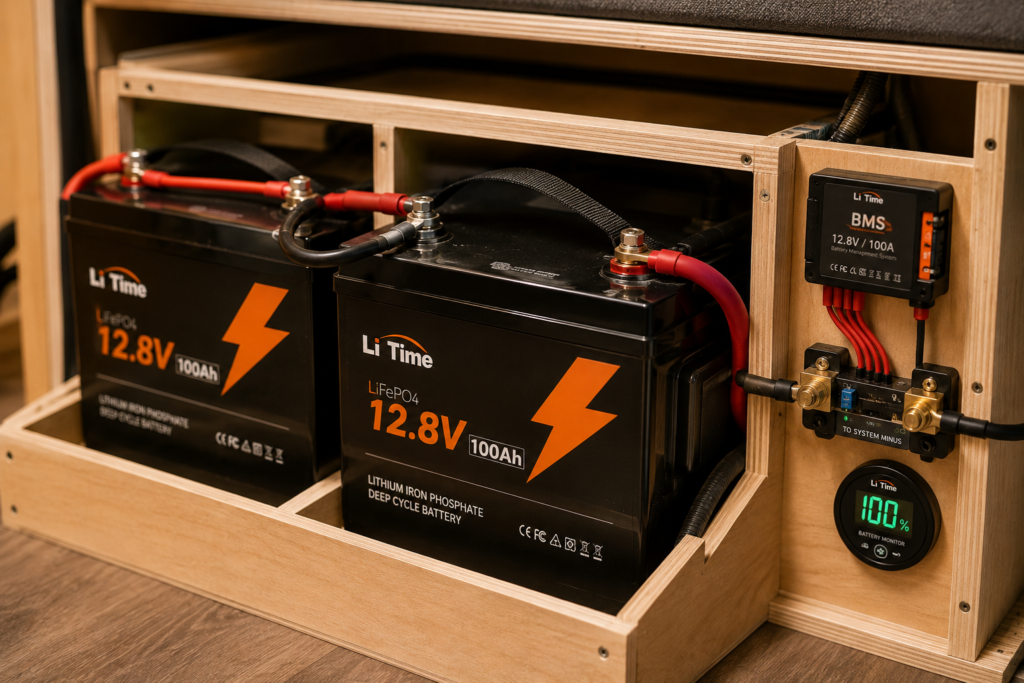
Lithium (LiFePO4) batteries are the current standard for serious van builds. They are lighter than equivalent lead-acid batteries, charge faster, discharge more completely (you can use 80–90% of their capacity vs 50% for lead-acid), and last significantly longer (2,000–4,000 charge cycles vs 300–500). The disadvantage: they cost two to three times as much upfront. For a full-time van lifer, the lifetime cost calculates in favor of lithium almost every time.
Lead-acid AGM batteries are a legitimate budget option for weekend warriors or anyone not dependent on consistent power. Heavier, less efficient, shorter-lived, but significantly cheaper.
An inverter converts DC electricity from your battery bank to AC electricity — the same power that comes from your home wall outlets. Needed for running laptops, phone chargers, coffee machines, and any other standard plug-in device.
A battery-to-battery (B2B) charger allows your van’s alternator to charge your leisure battery bank while driving. An essential addition for anyone spending time in cloudy locations or driving regularly — it means every hour of driving charges your batteries.
Shore power connection — A socket that allows you to plug your van into a campsite or home electricity supply. Useful for extended periods without sun or driving.
Sizing Your System
The most common sizing mistake is underbuilding and discovering the problem when you are three days into a cloudy week with a dead battery bank.
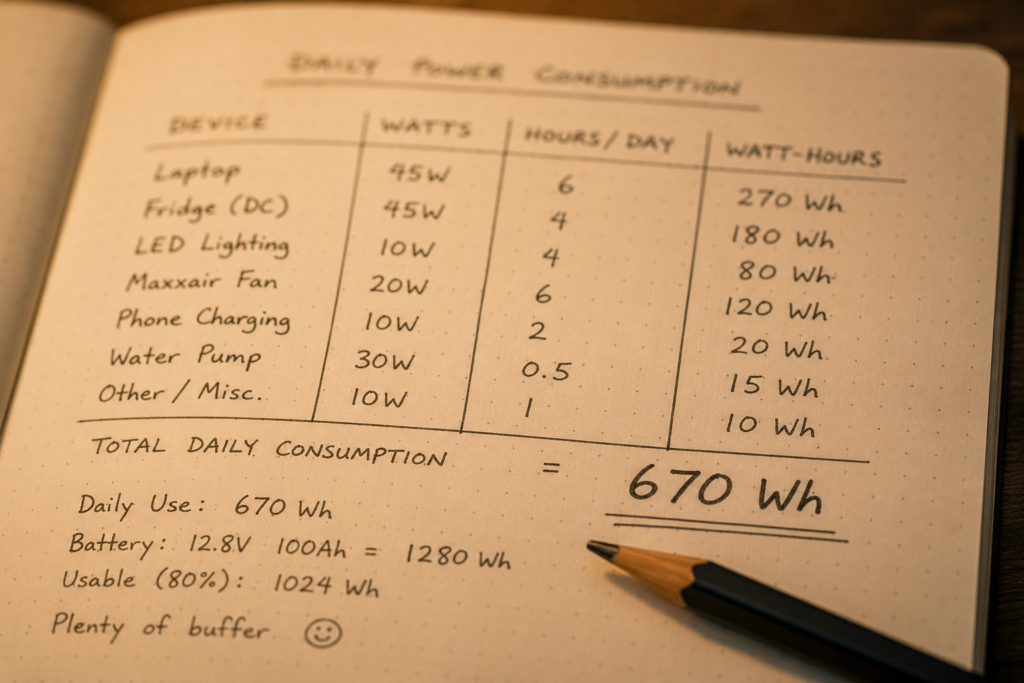
Start by calculating your daily power consumption. List every electrical device you plan to run, its wattage, and how many hours per day you use it. Multiply watts by hours to get watt-hours per day. Common daily consumption figures:
| Device | Watts | Hours/Day | Watt-Hours |
|---|---|---|---|
| Laptop | 45W | 6 hrs | 270Wh |
| Phone charging | 15W | 2 hrs | 30Wh |
| LED lighting | 20W | 4 hrs | 80Wh |
| Diesel heater fan | 10W | 8 hrs | 80Wh |
| 12V fridge | 45W | 24 hrs | 180Wh |
| USB devices | 15W | 2 hrs | 30Wh |
| Total | 670Wh |
For 670Wh daily consumption, you need a battery bank of at least 1,000Wh (to allow for the depth of discharge limits and safety margin) and solar panels producing at least 300–400W to reliably replenish in average sunlight conditions.
Running Your Wiring
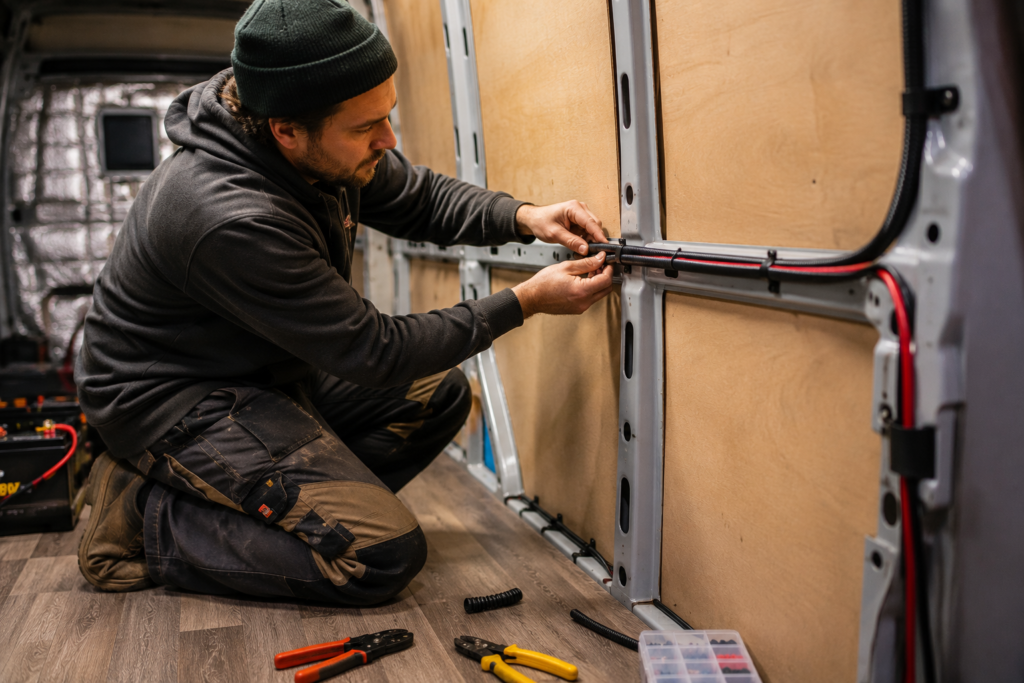
Run all wiring before the walls go on. Use marine-grade tinned copper wire — not standard automotive wire — for reliability and corrosion resistance. Size every wire correctly for the current it will carry — undersized wire is a fire risk. Use proper connectors and crimp tools rather than twist-and-tape connections. Install a fuse or circuit breaker on every circuit as close to the battery as possible.
If electrical wiring is genuinely outside your skill set, this is the one area of a van build where paying a qualified auto-electrician for a day of their time is money well spent.
Phase 5: The Furniture Build — Creating a Home in 80 Square Feet
The Layout Decision
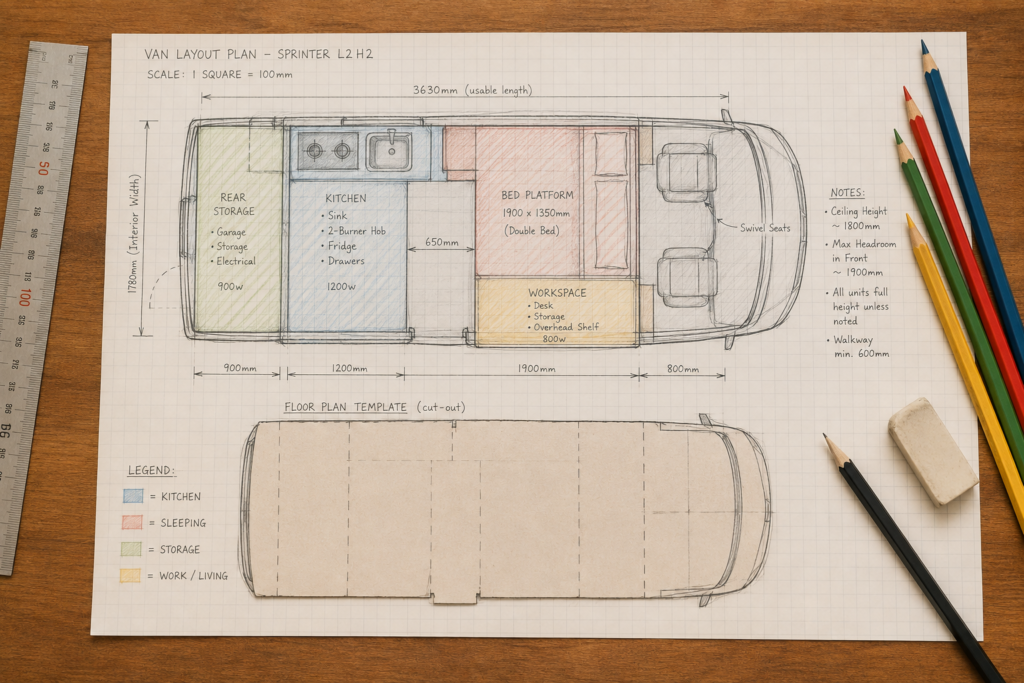
Before cutting a single piece of wood, draw your layout to scale on graph paper or in a free tool like SketchUp. The three most common layouts:
Fixed rear bed running lengthwise — The simplest and most common layout. The bed runs from the rear doors forward along one side of the van. Works for solo dwellers and couples in vans long enough to accommodate the full sleeping length (typically 6’6″ minimum). Leaves the other side of the van for kitchen, storage, and workspace.
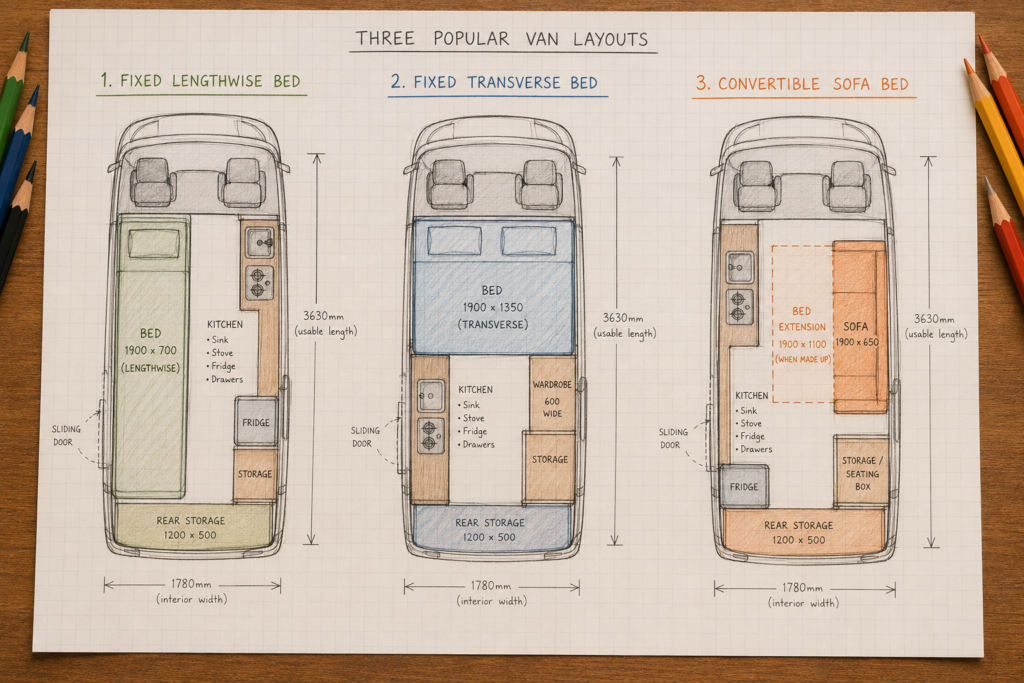
Fixed transverse bed — The bed runs across the full width of the van at the rear. Requires a high-roof van for comfortable access unless you are climbing in from the rear doors. The advantage is that it frees the entire length of the van for living space rather than sleeping space. Very comfortable for two people.
Convertible sofa bed — A bench seat that converts to a sleeping platform. Frees the interior for daytime use but adds daily setup and takedown. Worth it for shorter vans or anyone who values having a dedicated living space during the day.
Building the Bed Platform
The bed platform is the foundation of the entire interior and usually the first thing built. It must be:
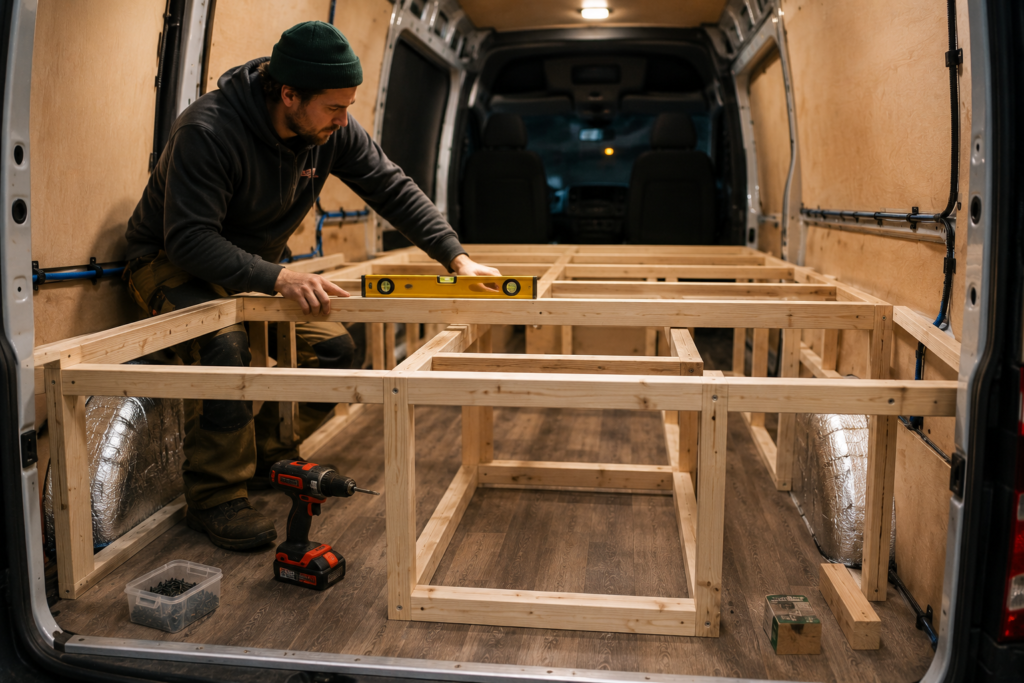
Strong enough to support two people plus storage weight. Build the frame from 44x44mm or 44x69mm timber — do not use lighter timber to save money. The bed frame is load-bearing and this is not the place to economize.
The right height. Too high and you lose headroom for sitting in bed. Too low and you lose storage space underneath. The sweet spot for most vans with a standard roof is 300–350mm off the van floor — high enough for four large storage drawers underneath, low enough to sit comfortably with the ceiling above.
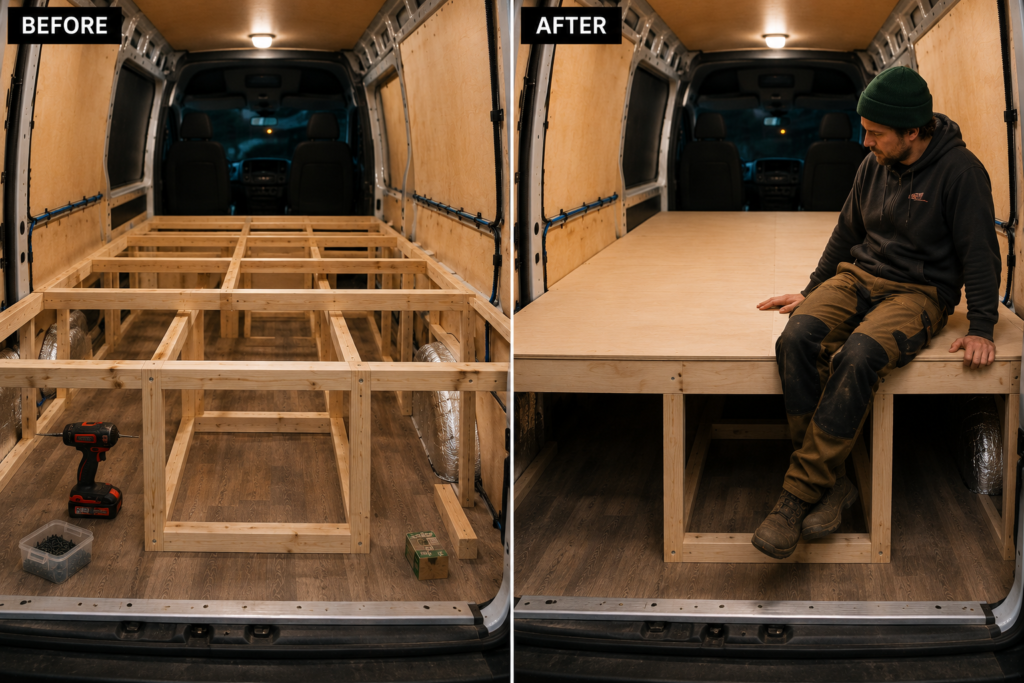
Finished to last. Sand every surface. Round every edge. A sharp corner on a bed frame that you brush past twice a day in a narrow van becomes a genuine quality-of-life issue.
The Kitchen Unit
The van kitchen needs to solve three problems in minimal space: food preparation, cooking, and storage.

The cooktop: A two-burner propane or butane stove handles the vast majority of van cooking needs. A built-in propane cooktop with a flush lid that doubles as additional counter space is the most elegant solution. Induction cooktops are increasingly popular in high-power electrical builds — no gas in the van, faster cooking, easier to clean.
Counter space: Every centimeter of counter space in a van kitchen is precious. The over-sink chopping board — a custom-cut piece of timber that sits across the sink basin — doubles your prep space instantly at zero additional cost.
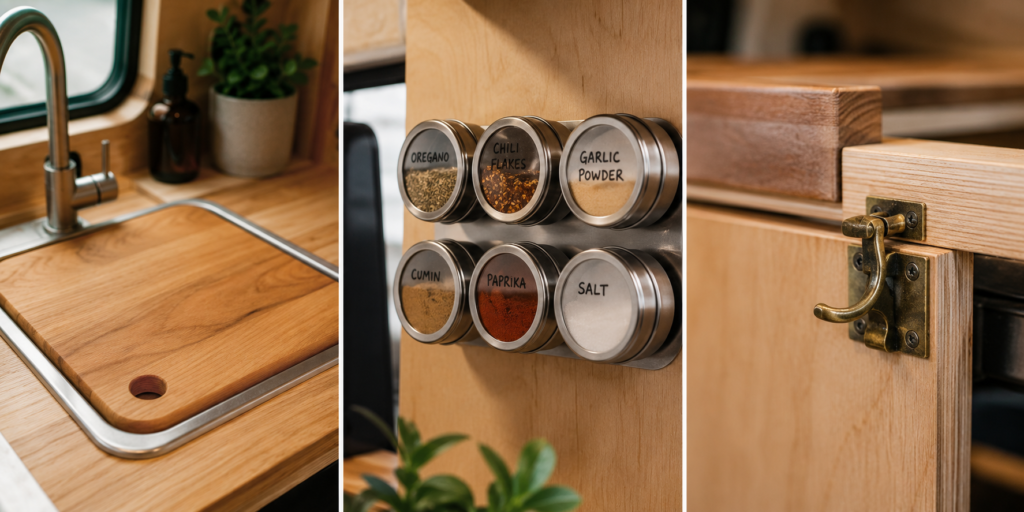
The sink: A small stainless steel sink — 250mm x 250mm is sufficient for most van cooking needs — fed by a 12V water pump drawing from an underbed water tank. A foot pump rather than an electric pump saves power and gives you precise control over water flow.
Storage: Design your kitchen storage around the specific items you will store. Measure your pots, pans, plates, and food containers before building any cabinet. Every cabinet in a van kitchen should have a positive closure — a latch, a magnetic catch, or a drawer with a lip — to prevent contents launching themselves across the van on a tight corner.
The Garage — Underbed and Under-Seat Storage
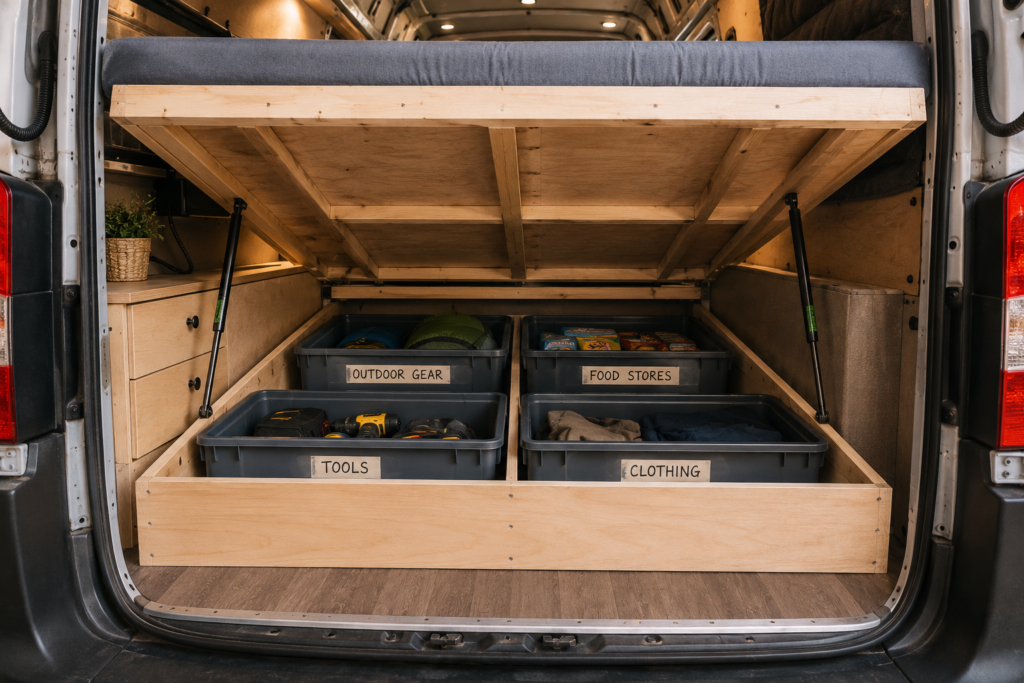
The storage space beneath a fixed bed platform is some of the most valuable real estate in the entire van. A full-width pull-out drawer on full-extension runners gives access to every corner of this space and can hold the equivalent of a large wardrobe in organized bins and bags.
If drawers feel beyond your current woodworking skill level, a hinged bed platform — on gas struts that hold it open like a car bonnet — provides full access to the underbed space with minimal complexity.
Finishing Details That Make the Difference
The difference between a van build that looks like a project and one that looks like a home is almost always in the finishing details:
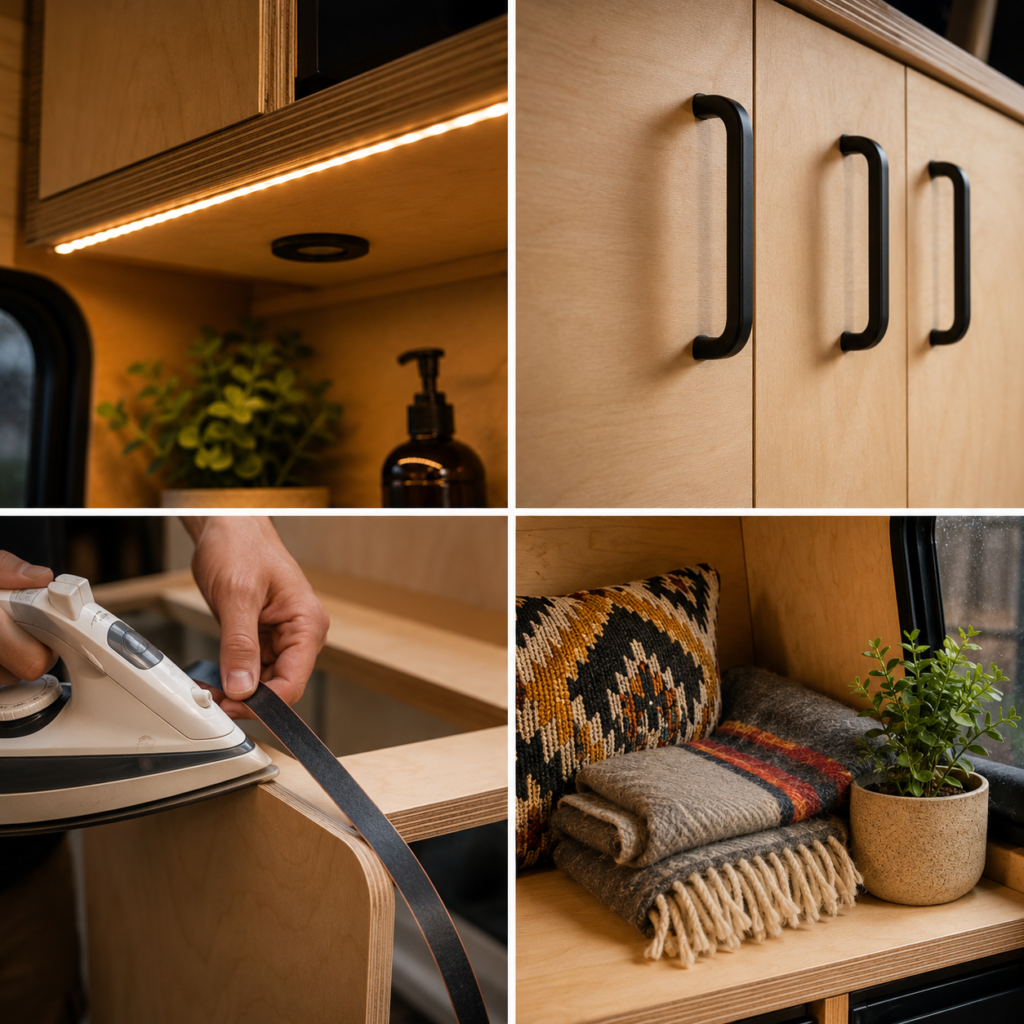
Lighting: LED strip lights run under cabinets and along ceiling edges provide warm, dimmable ambient light that makes the van feel like a home rather than a workshop. A reading light mounted above the bed head is more useful than you expect. Use warm white (2700–3000K) throughout — cool white lighting makes a small van interior feel clinical and cold.
Handles and hardware: Consistent hardware throughout — all brass, all black, all chrome — ties the interior together visually. Mismatched hardware is the most obvious sign of a build that evolved without a plan.
Edge banding: Raw plywood edges on cabinet doors and shelving look unfinished. Iron-on edge banding in a matching veneer takes twenty minutes to apply and makes every cabinet look properly made.
Soft furnishings: Cushions, a rug, curtains. The things that look like they belong in a home rather than a vehicle are the things that make the van feel like one. Do not leave these until after everything else is finished — factor them into your design from the beginning.
Phase 6: Water, Heating, and Ventilation
The Water System
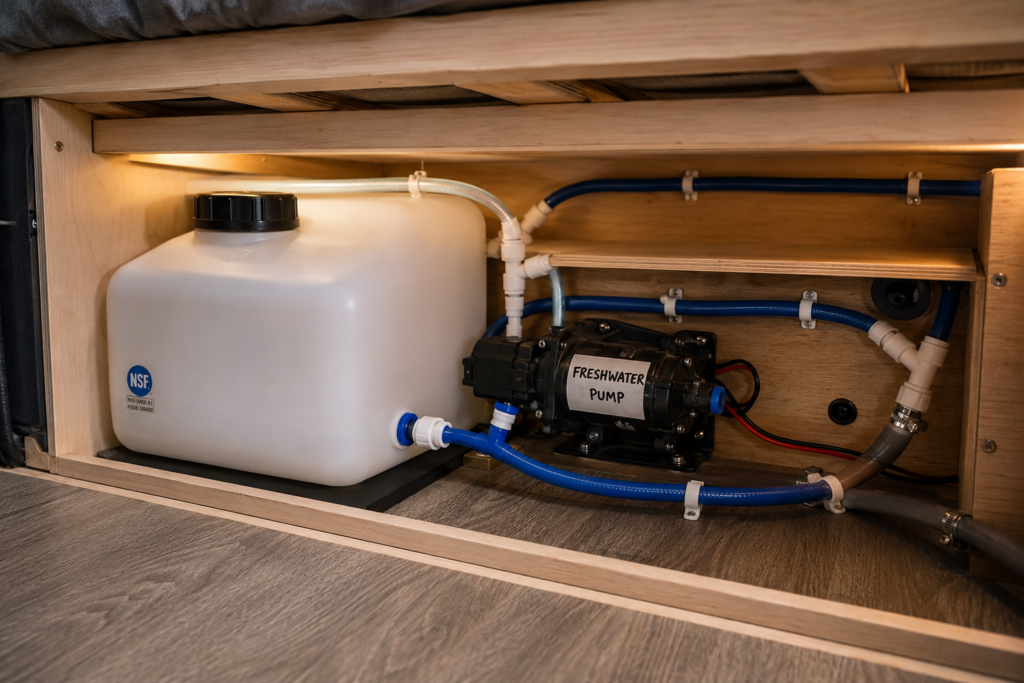
A basic van water system requires four components: a tank, a pump, a tap, and a drain.
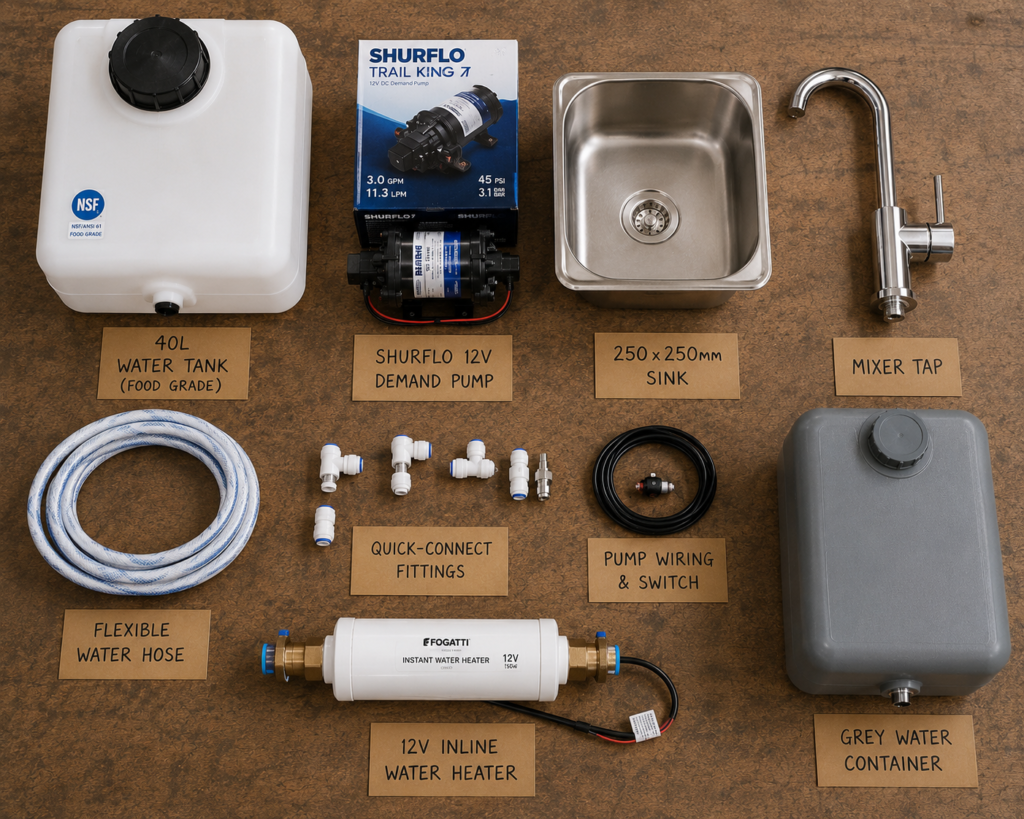
Fresh water tank: 30–60 liters is sufficient for most solo or couple builds. Position it as low and as centrally as possible for weight distribution. Underbed or under-seat locations work well. Use a food-grade tank — not a recycled chemical container.
12V water pump: A demand pump that activates when the tap is opened and stops when it is closed. Shurflo and Flojet make reliable, widely available pumps at $40–$80.
Grey water: The water that drains from your sink needs somewhere to go. Options range from a simple grey water tank (a sealed container under the van that you empty regularly) to a drain hose that exits through the van floor to the road surface. The legality and practicality of direct road drainage varies by location — check local regulations.
Hot water: A propane or diesel-powered instant water heater provides hot water on demand. Propane tankless heaters ($60–$150) are compact, effective, and simple to install. They require venting to the outside — never vent a gas appliance inside an enclosed van.
Heating
A diesel or propane heater is the single most important comfort investment in a van build for anyone planning to use their van in temperatures below 10°C.
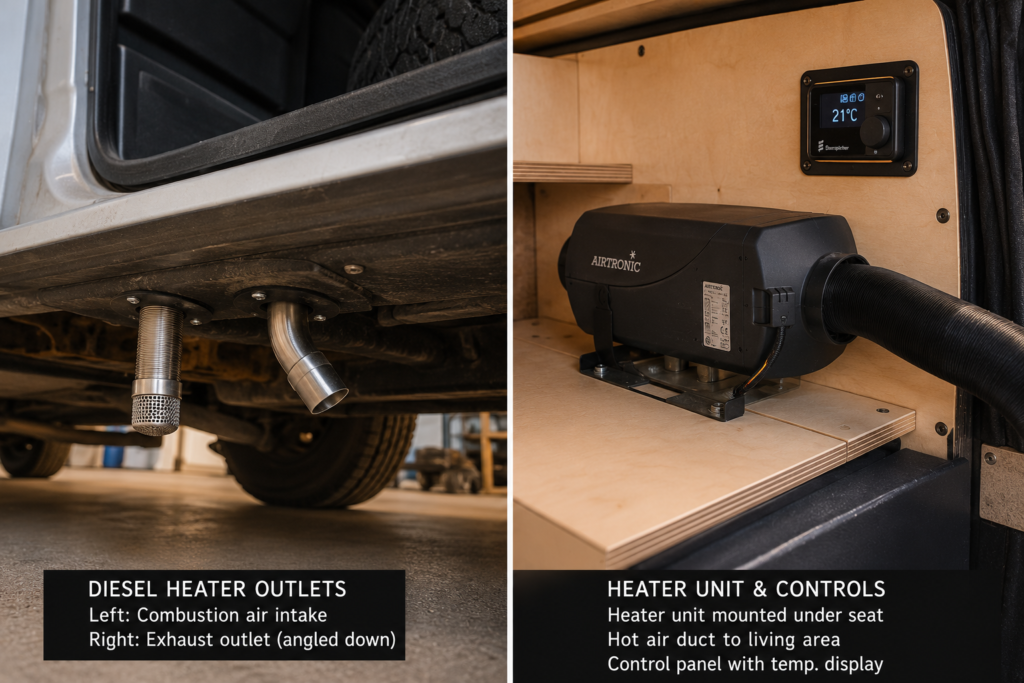
Diesel heaters (Webasto, Espar, and the widely-used Chinese-manufactured alternatives marketed as Vevor, Fogatti, and others) draw fuel from the van’s main diesel tank and burn it in a sealed combustion chamber, then blow hot air through a duct into the living space. No combustion gases enter the van — only clean warm air. Highly efficient, reliable in extreme cold, and capable of maintaining comfortable temperatures even in sub-zero conditions.
The Chinese-manufactured diesel heaters — available for $150–$300 vs $800–$2,000 for a Webasto — have developed a solid reputation among van lifers over the past five years. They are not identical in quality to the German alternatives, but for most van life applications they perform well and the savings are significant.

Propane heaters (Mr. Heater Buddy and similar) are the simplest and cheapest option — no installation required, just open the valve and light. The disadvantage is that they produce water vapor as a combustion byproduct, adding to condensation. Use only with excellent ventilation.
Ventilation
A roof vent fan — Maxxair or Fan-Tastic are the most popular brands — is one of the best investments in the entire build. Running on low continuously, it creates a constant gentle airflow that manages condensation, removes cooking smells, and keeps the van surprisingly fresh and comfortable even in summer.
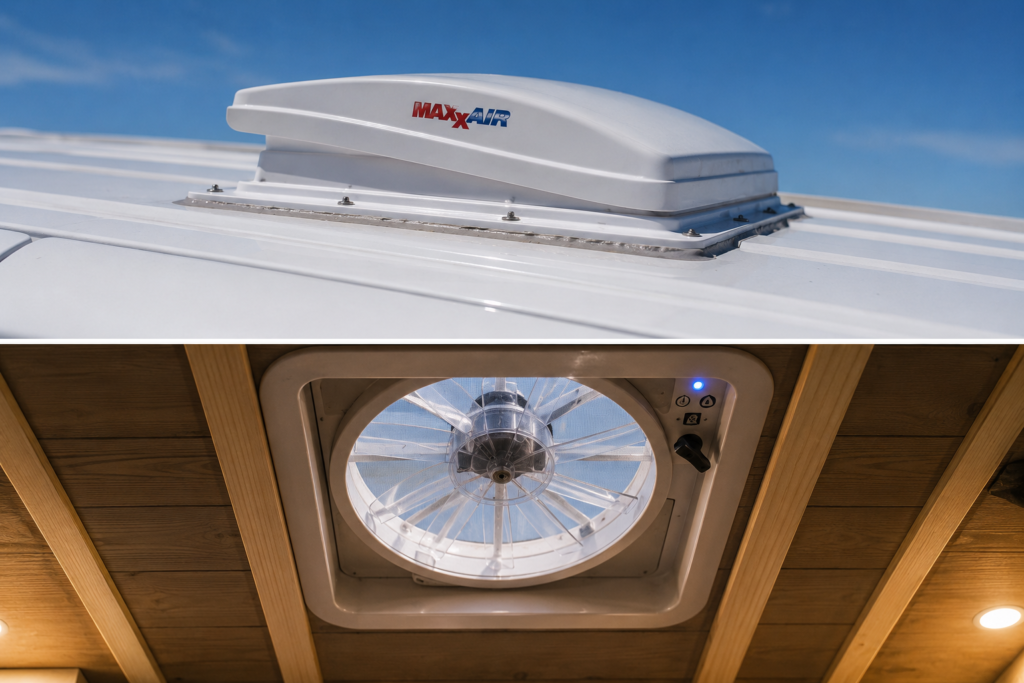
Cut the hole in the roof before any ceiling work — measure three times, cut once. The fan mounts over the hole and seals with a butyl tape gasket. Size: 400mm x 400mm is standard for both major brands.
Phase 7: The Finishing Touches That Turn a Build Into a Home
The Things Nobody Talks About in Build Guides
Most van conversion guides end when the major systems are in and the furniture is built. But the things that determine whether you are comfortable and happy in a van every day are often the small decisions that nobody documents.
A proper front cab area: Blackout window covers for the front windscreen and cab windows are not optional — they are the difference between sleeping and not sleeping. Custom-fit covers using Reflectix (reflective foam insulation) are cheap to make and block 95% of light and significant heat.
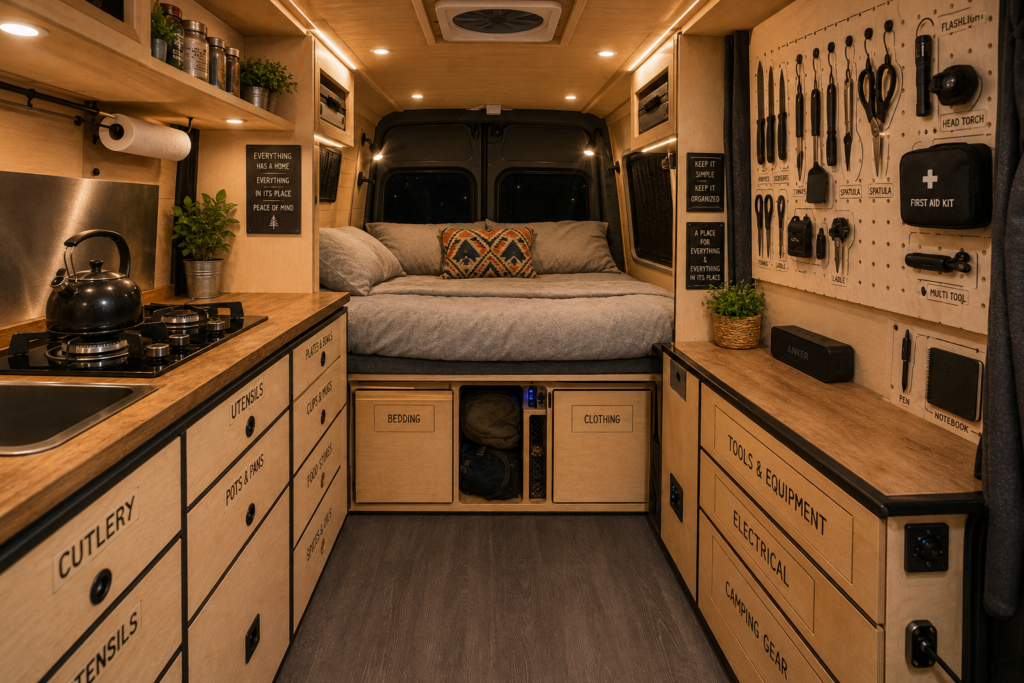
The organizational layer: Every drawer, every cabinet, and every surface needs to have a specific, assigned home for every object it contains. In a van, the organizational layer is not a convenience — it is the system that determines whether daily life runs smoothly or is a constant low-grade frustration. Spend time on this after your build is finished and the van is lived in. Reorganize ruthlessly as you discover what actually works.
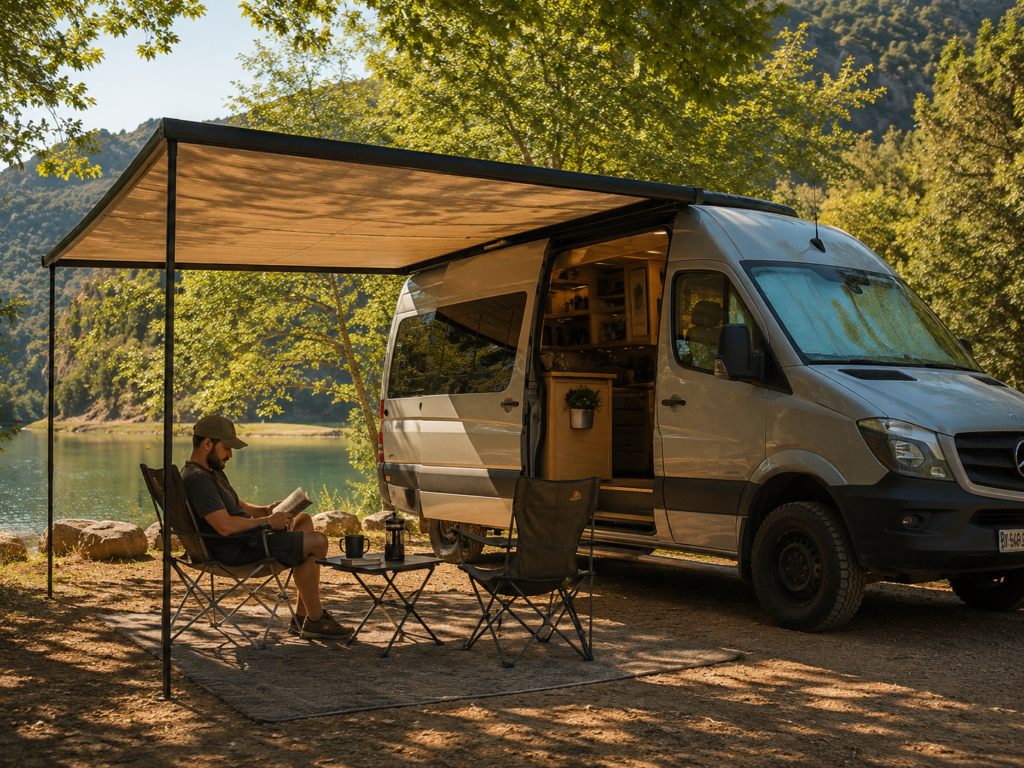
The outdoor living extension: A side awning mounted above the sliding door transforms your usable living space in good weather. A cheap Chinese-made awning costs $80–$150 and provides shade and rain cover for an outdoor seating area that doubles your effective living space when conditions allow.
The shoe system: Muddy, wet shoes brought inside a small van are a daily quality-of-life destroyer. A dedicated shoe storage area at the door — a tray, a rack, a net — that keeps outdoor footwear outside the living area is worth building from day one.
The Budget Reality: What a Camper Van Renovation Actually Costs
| Component | Budget Build | Mid-Range Build | High-End Build |
|---|---|---|---|
| Insulation | $200–$400 | $400–$700 | $700–$1,200 |
| Wall/ceiling cladding | $150–$300 | $300–$600 | $600–$1,500 |
| Flooring | $80–$150 | $150–$400 | $400–$800 |
| Electrical system | $400–$800 | $800–$2,500 | $2,500–$6,000 |
| Furniture and kitchen | $500–$1,000 | $1,000–$3,000 | $3,000–$8,000 |
| Water system | $150–$300 | $300–$600 | $600–$1,500 |
| Heating and ventilation | $200–$400 | $400–$800 | $800–$2,000 |
| Finishing details | $100–$300 | $300–$700 | $700–$2,000 |
| Total | $1,780–$3,650 | $3,650–$9,300 | $9,300–$23,000 |
These figures assume DIY labor throughout. Professional conversion labor adds $50–$150 per hour on top of materials.
The Timeline: How Long Does a Van Conversion Take?
A realistic timeline for a first-time builder working on weekends:
Basic functional build (sleeping platform, basic electrical, insulation): 4–6 weekends
Mid-range comfortable build (full kitchen, proper electrical, all cladding, water): 10–16 weekends
Full high-end build (all of the above plus shower, complex electrical, custom furniture): 20–30 weekends
Every build takes longer than expected. Accept this before you start and it will bother you less when it happens.
One Last Thing Before You Pick Up That Drill
Here is what the most experienced van builders say when you ask them what they wish they had known at the start.
They say: build simpler than you think you need to. The van you imagine before you have lived in one is always more complex than the van you actually want after six months on the road. The elaborate fold-out desk, the complicated convertible sofa, the shower that requires seventeen steps to set up — these things look good in planning and reveal their impracticality in daily life.
Start with the essentials. A good bed. Proper insulation. A reliable electrical system. A kitchen that actually works. Get on the road. Live in the van. Let the experience tell you what is missing. Then add it.
Because the truth about van renovation is the same truth that applies to the life it enables: you learn by doing, the doing is the point, and the best version of the thing is always the one shaped by real experience rather than imagined perfection.
Your van is waiting. Go build something.
Working on your own van conversion? Share your build in the comments — questions, progress photos, mistakes, breakthroughs. This community has seen it all and loves to help.
Get the : The Ultimate Guide to Converting a Campervan
You might also enjoy:
- 10 Smart Campervan Kitchen Storage Ideas to Maximize Small Spaces
- How to Live in a Car, Van, or RV: The Honest Guide to Financial Freedom
- The Ultimate Campervan Road Trip Through Morocco: Routes, Tips, and Wild Camping